Logo image

Chapter 2 Your First Repository

Section 2.1 Making an Account

All the features of GitHub we’ll be using are available using a free GitHub account.
For additional free resources, you may also be eligible for a waiver.

Note 2.1.2.

Many students and faculty of schools, colleges, and universties are eligible to request an educator discount, providing “Pro” features at no cost, by visiting https://education.github.com/ while logged into their GitHub account.
You do not need to wait for approval of your educator discount before continuing to the next section.

Section 2.2 Creating the Repo

Once logged in, a new repository can be created by pressing the + button in the toolbar, or visiting https://github.com/new.
The repository will need a name, which can be something like my-first-repo for this tutorial. (GitHub will also suggest a cute random name like ubiquitous-space-tribble if you have writer’s block.)
Repositories can be public to everyone on the internet or private to only people you approved. I encourage you to work publicly, to make it easier to collaborate with the open-source community – I can personally attest to publishing many garbage repositories on GitHub (along with my hopefully-useful ones), and no one has called me out for it yet!
The last option we’ll make sure to select is to “Initialize this repository with: Add a README file”. Then click “Create repository”.

Section 2.3 Editing README.md

While logged into GitHub.com, you have the ability to edit individual files on your repositories. (If your repository is public, others can see those files, but cannot edit them unless you make them a collaborator, see Chapter 5.)
An easy way to edit an individual file is just to click the pencil icon such as the one that appears on your README. This file is written in “Markdown”.
Try to edit your file to say something like “I’m learning how to use GitHub!”, perhaps adding a link back to this document using [this markup](https://g4m.clontz.org). You can click the Preview tab to see what your README will look like. GitHub also provides a panel of several formatting options you can click on.
When you’re happy with your updated README, click the “Commit changes” button. This will create a new commit, representing a new moment in your project’s history. You should write a useful commit message summarizing the work you’ve done since your last commit (or perhaps keep the default “Update README.md”) Doing this will update the README visible on your repository homepage on GitHub.com.

Remark 2.3.2.

README files are important! If you ever want to share your repository source with someone else, it’s the first thing they will read. Likewise, if you want to use someone else’s repository, they will hopefully include first steps in their own README file.
Finally, you might be interested in visiting the “Insights” tab for your repository, and specifically the “Network” page. It should reveal a graphic similar to Figure 1.1.1 visualizing the history of your project across all GitHub collaborators. Right now you don’t have any collaborators and just a couple commits, but keeping in mind this model for your project history will be useful as we juggle various commits and pushes and syncs and so on down the line.

Section 2.4 Using GitHub.dev

Using the GitHub.com interface to author or edit just one file can be useful (I do this all the time to make quick typo fixes on my blog), but you will likely be using GitHub to manage projects that involve editing mulitple files at the same time, and likely you will have non-text files (such as images) that you need to include in your work as well.
One way to quickly be able to manage several files at once is to use the GitHub.dev
 1 
github.dev
service offered by GitHub. Try clicking that link - you should have a fully-functional VS Code text editor right inside your web browser.

Note 2.4.1.

It’s best to use an updated version of Chrome, Edge, or Firefox when using GitHub. In particular, Safari tends to show off its rough edges when using advanced web applications like GitHub.dev, so it’s best to choose an alternative.
You can create files, edit them, upload images, and do whatever you like at GitHub.dev. But this isn’t your repository - it’s just an example. So, we’ll need a way to tell GitHub.dev we want to work on the repository we just made instead.

Note 2.4.2.

There are two very easy ways to access the GitHub.dev service. The first is to just change the address of your repository from GitHub.com to GitHub.dev in your browser. For example, if your repository lives at https://github.com/YourUserName/YourGreatRepo, you should visit https://github.dev/YourUserName/YourGreatRepo.
The other trick is even fancier. When you are visiting https://github.com/YourUserName/YourGreatRepo in your web browser and not writing in a text box, press the period (.) key.
Either way, you should now have a GitHub.dev window where you can manage all the files of your project. Using the Explorer sidebar (Figure 2.4.3), you can create new files, rename files, move files, upload files, and more. Selecting a file opens it, and lets you edit it as needed. Your changes are saved automatically in GitHub.dev, but they won’t show up at GitHub.com just yet.
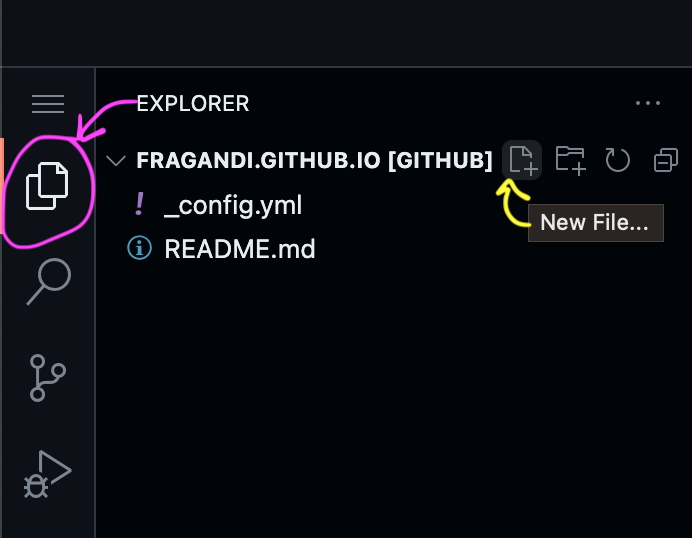
Figure 2.4.3. Explorer sidebar and New File button

Section 2.5 Commiting Your Work

After you’re tried creating/editing/uploading a few files, now it’s time to commit those changes to your repository. The easiest way to do this is to use the Source Control sidebar. You may have noticed that a numerical badge appeared by the Source Control icon as you created, edited, or deleted files. This number represents the number of files that have been changed in some way since the previous commit. By opening the Source Control panel, you’ll see a list of these files.
Clicking these file names not only lets you open the file and edit it further, but you are shown a diff - a summary of the lines that have been altered since the previous commit. (This is a good reason to not write in a long continuous line, but to break lines every 80ish characters or so. That way you can easily see where exactly a change is made between each commit.)
The idea is this: edit as you see fit, knowing that your files are being saved at GitHub.dev and won’t be lost if you accidentally refresh your web browser. However, you’ll need to eventually commit those changes to the repository in order to share your work with anyone else, and to ensure that the work is preserved in the long term. The Source Control panel provides a place to write a commit message, a short phrase or sentence that summarizes the work you’ve done. (Writer’s block? For now just type “learning GitHub.dev”.) Then once you click the “Commit and Push” button, your work will be logged as a permanent commit to the repository.
This is a good point to review your commit history again. You probably have three commits: the initial commit made when you created the repository, the README.md update you made using GitHub.com’s editing interface, and this more elaborate GitHub.dev commit involving possibly several files. To visualize this history, you can go to the Insights/Network page described earlier, or click on the “3 commits” link from your GitHub.com repository homepage to see a linearization of this history. From there you can click on each commit to see exactly what has changed from the previous commit across all files.